History of Photography
Well done, precise work.
Camera Obscura
|
Camera obscura, is one of the first photographic camera. The Latin name means “dark chamber." The earliest versions of a camera obscura dates back to the antiquity. A camera obscura consisted of small darkened rooms with light admitted through a single tiny hole. This inverted an image of the outside scene which casted on a wall, which was usually whitened so that it could be easier to see the reflected image. For centuries, the technique was used for viewing eclipses of the Sun without endangering the eyes. By the 16th century, it was used as a an aid for drawing for many artists. For example, Leonardo Da Vinci. The subject was posed outside and the image reflected on a piece of drawing paper for the artist to trace. Portable versions were built, followed by a smaller version, and even pocket sized models. the camera obscuras box was painted black, and the image reflected by an angled mirror so that it could be viewed right side up so that the artist could trace there drawing.
|

|
My Camera Obscura
Materials- Black Cardboard
- Tracing paper - Magnify glass |
|


How I made My Camera Obscura
Firstly, I folded my cardboard into 4 sides and folded it into a box, which made our interior. I then cut up a piece of tracing paper which would fit onto our box. The tracing would be then used to reflect our image. After that I got a blank piece of black cardboard and then cut it up as we did to our tracing paper. However, I used a craft knife to cut a hole in the middle so our magnify glass could look through the reflected image. Then we made an extension tube to improve the focal length so we could see the reflected image properly. Finally, I used a magnify glass as my lens and taped it onto my extension tube.
WWW And EBI
I think what went well was the clarity of the image as you could see the reflected image clearly, this could be because of the focal length as it has to be the right length to see the reflected image properly and clearly.
However, my camera obscura can improve by the construction of it. I think this because I think the camera obscura isn't very adaptable and the presentation is not very neat. In compassion, I would improve my drawing skills on drawing the reflected image as it was very 'slanted'.
However, my camera obscura can improve by the construction of it. I think this because I think the camera obscura isn't very adaptable and the presentation is not very neat. In compassion, I would improve my drawing skills on drawing the reflected image as it was very 'slanted'.
Well done Alvin, thorough work.
DSLR Camera

|
1 = Shutter Button
2 = Red eye reduction/ self-timer lamp 3 = Lens Mount 4 = Lens Mount Index 5 = Lens Release Button 6 = Mirror 7 = Microphone 8 = Built In Flash |
|
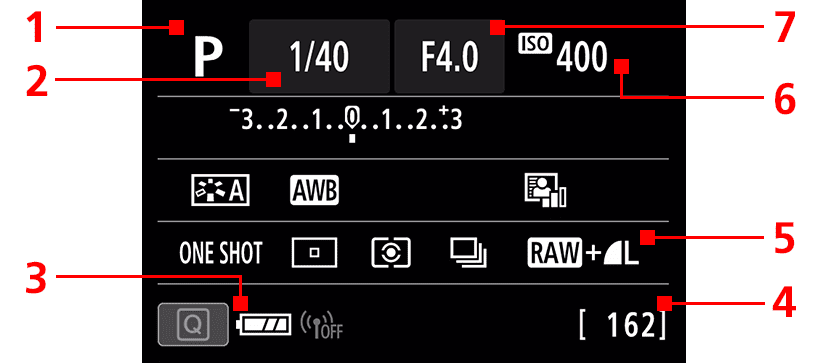
1 = Shooting Mode
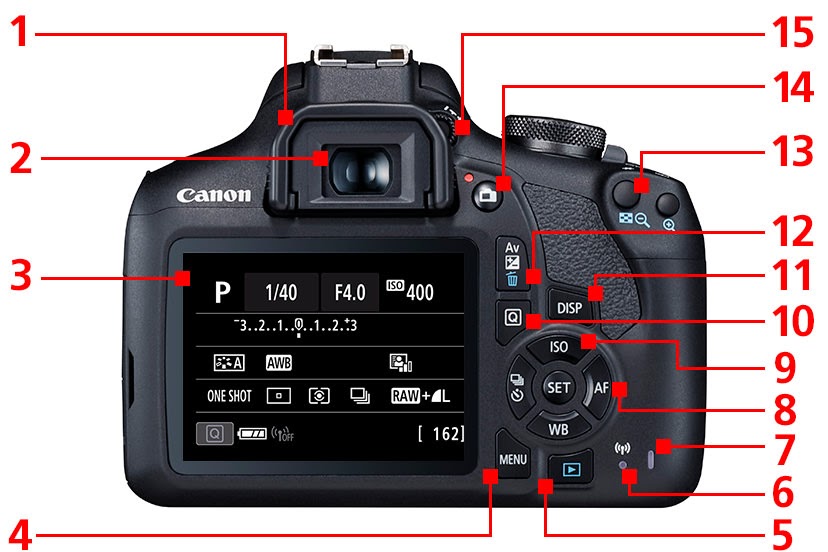
2 = Shutter Speed 3 = Battery Level 4 = Shoots Remaining 5 = Image-Recording Format/ Quality 6 = ISO Speed 7 = Aperture Value 1 = Eye Cup
2 = Viewfinder Eyepiece 3 = LCD Monitor 4 = Menu Button 5 = Playback Button 6 = Wi-Fi Button 7 = Access Button 8 = Set Button/Multi-Controller 9 = ISO Speed Setting Button 10 = Quick Control Buton 11 = Display Button 12 = Erase Button 13 = Focus Point Selection Button 14 = Live View Shooting/Movie Shooting Switch 15 = Dioptric Adjustment Knob |
|
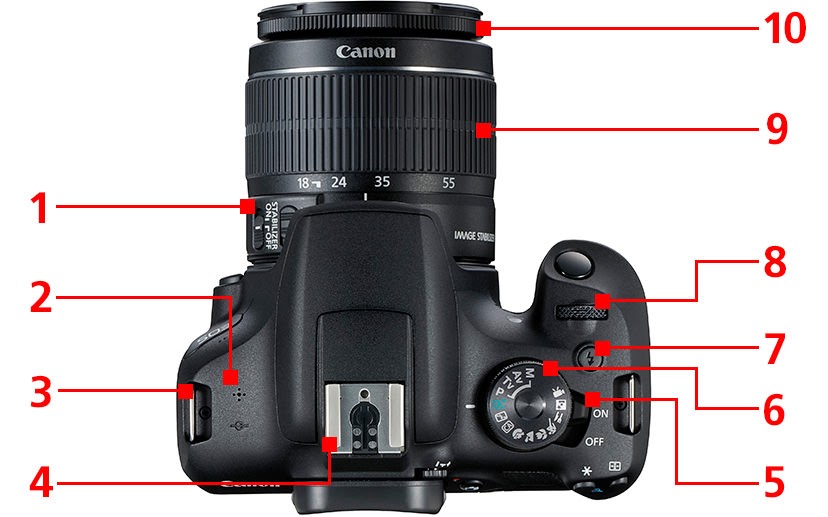
1 = Focus Mode Switch
2 = Speaker 3 = Strap mount 4 = Hot Shoe 5 = Power Switch 6 = Mode Dial 7 = Flash Button 8 = Main Dial 9 = Zoom Ring 10 = Focus Ring |
My Images


Best Edits
What Settings Did You Have Your Camera On?
ISO: Sensitivity 400
Program Mode: TV / Shutter Speed Priority
Shutter Speed: 1/60th of a second
What Theme Were You Asked To Respond To?
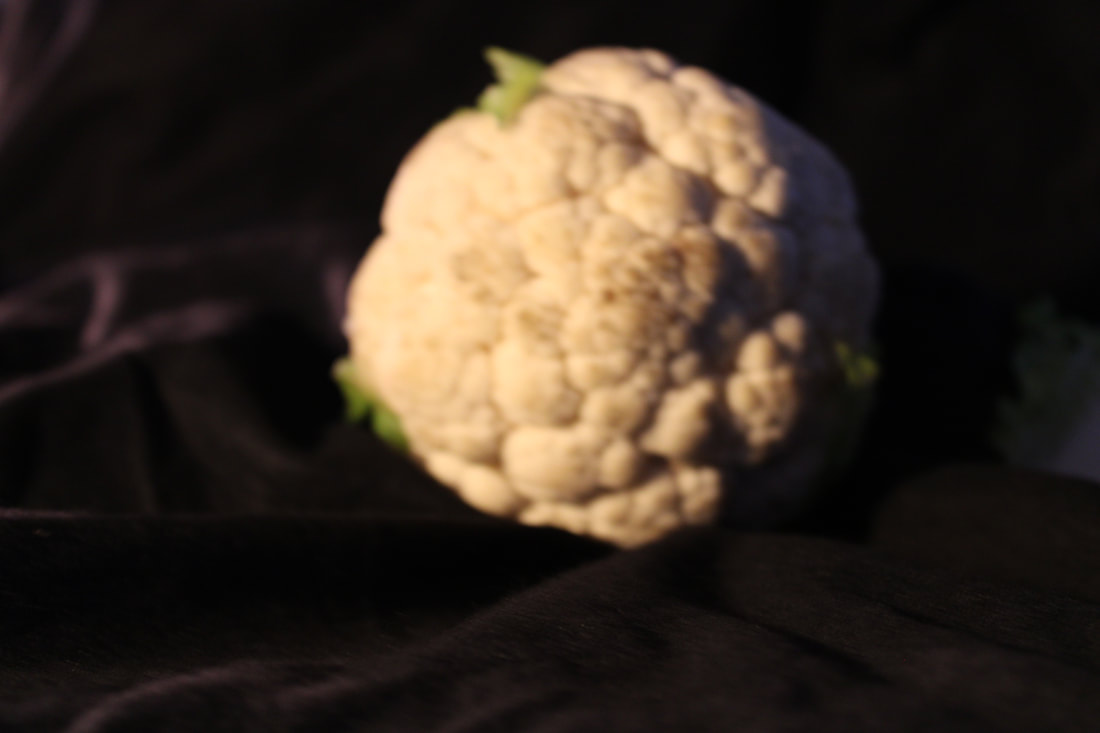
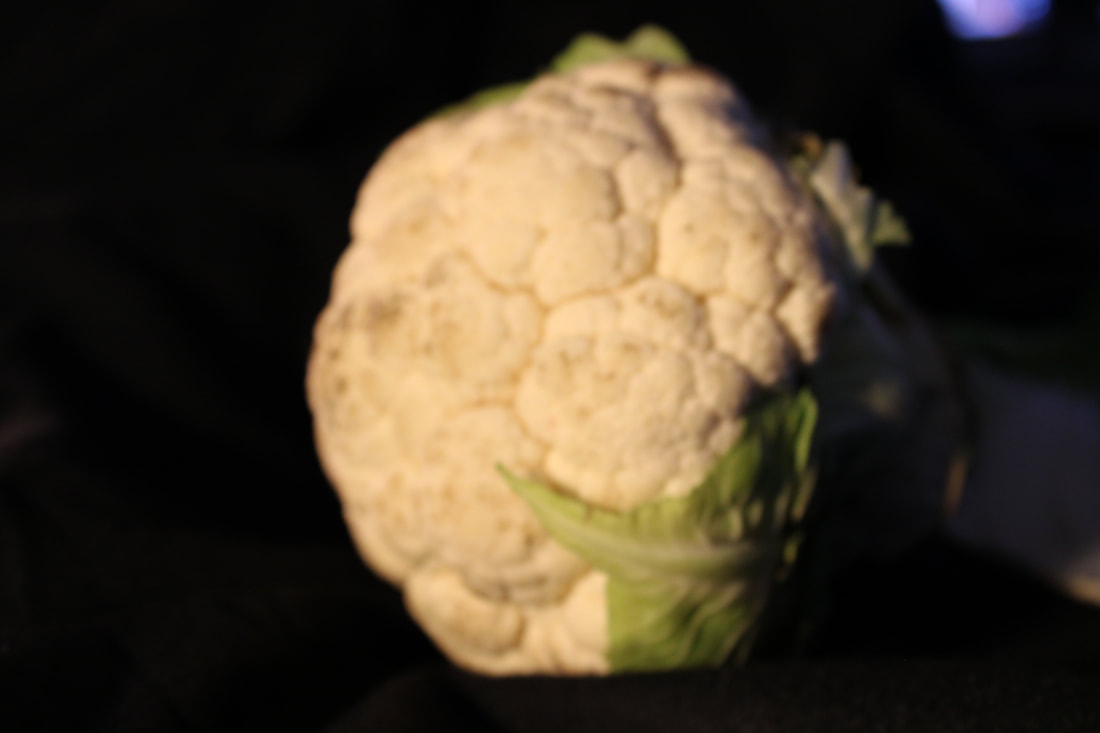
The theme that I was told to take pictures of was natural and manmade.
Do You Feel That You Photographed Appropriate Images? Did You Find Anything Difficult E.g. Composition Or Exposure?
I think I did photograph appropriate images because the task was to take pictures of natural and manmade compositions.
I think one thing that was difficult to me was the exposure as it was very sunny and there was a lot of light which means I would had to bring the ISO number down.
ISO: Sensitivity 400
Program Mode: TV / Shutter Speed Priority
Shutter Speed: 1/60th of a second
What Theme Were You Asked To Respond To?
The theme that I was told to take pictures of was natural and manmade.
Do You Feel That You Photographed Appropriate Images? Did You Find Anything Difficult E.g. Composition Or Exposure?
I think I did photograph appropriate images because the task was to take pictures of natural and manmade compositions.
I think one thing that was difficult to me was the exposure as it was very sunny and there was a lot of light which means I would had to bring the ISO number down.
Best Edits


Well done Alvin, mature work.
Shutter Speed
What Is The Shutter Speed
Shutter Speed = The amount of light that reaches the image sensor of the camera that is proportional to the exposure time of the shutter.
What Is The Measurement?
The shutter speed is measured In fractions. For example, 1/200 seconds.
What Setting Should The Program Dial Be On?
The program dial on your camera should be set on to TV.
Set 1


|
Aperture = f/11
Shutter Speed = 1/200 ISO = 3200 |
Aperture = f/10
Shutter Speed = 1/200 ISO = 3200 |
Aperture = f/9
Shutter Speed = 1/200 ISO = 3200 |
It would be great to have the meta data for these images. You can use Bridge.
Set 2
Camera Settings
ISO = 400
Shutter Speed = 1/200
Aperture = f/4.5
Shutter Speed = 1/200
Aperture = f/4.5
ISO = 400
Shutter Speed = 1/50 Aperture = f/4.0 |
ISO = 400
Shutter Speed = 1/200 Aperture = f/4.5 |

ISO = 400
Shutter Speed = 1/20
Aperture = f/11.0
Shutter Speed = 1/20
Aperture = f/11.0
WWW And EBI
WWW = One thing that went well when I was using the shutter speed to take my photos was changing the dial by getting a slow shutter speed for a blurry effect and increasing the shutter speed giving me a 'clean' image.
EBI = If I could position my camera right to fit the model and to not have negative space around the model or composition. Also, if I had the same action at varies shutter speeds to see the differences of how a different number of shutter speeds looks in a photo.
Also if you had the same 'action' at different shutter speeds so we could compare more directly.
Levitation Photography
First Attempt
What Was I Trying To Achieve
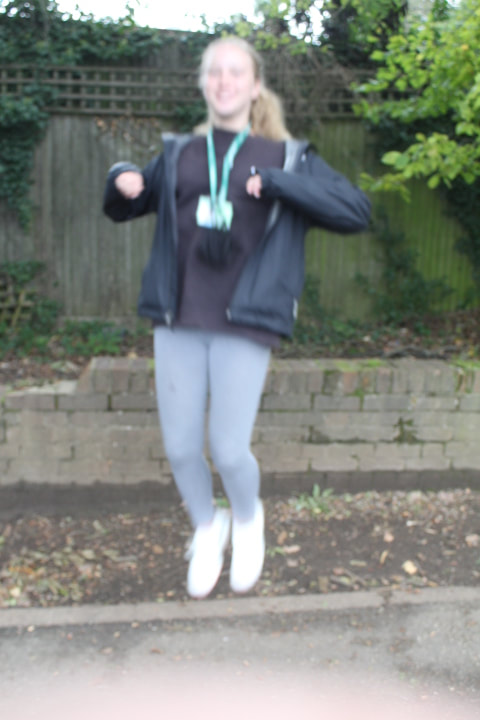
The pictures I was trying to achieve was a levitation illusion. My mode has to jumps in the air (with flat feet's), have a straight face and narrator a story to create this illusion. My job was to take the photo with continuous shoot on, shutter speed at 400, the ISO at 400 and the dial at TV (shutter speed priority).
How Does It Link To The Theme Of Movement
Levitation photos link to movement because its a practice of theatricality and choreography. These photos tell us a story in multiple layers by the motion and movement from the model.
Best Edits - Levitation
Homework - Levitation
Homework - Levitation 2
WWW & EBI
WWW = one thing that went well was the use the props and how the model represented them while trying to create a levitation evolution.
EBI = One thing that I would improve is that it was very difficult to get the right exposure of light as I was using my phone to take these pictures. Also, it was very difficult to take a picture at the right time where the model is jumping as I did not have continuous mode. Furthermore, 0ne thing that I could improve is to have my models feet parallel to the floor. Also if your model had their feet parallel to the floor.
EBI = One thing that I would improve is that it was very difficult to get the right exposure of light as I was using my phone to take these pictures. Also, it was very difficult to take a picture at the right time where the model is jumping as I did not have continuous mode. Furthermore, 0ne thing that I could improve is to have my models feet parallel to the floor. Also if your model had their feet parallel to the floor.
Yowayowa
Natsumi Hayashi or known as Yowyowa, she is best known for her levitation photographs of herself, jumping in the air to create a levitation illusion around the city.
- She usually shoots her photos with a shutter speed of 1/500th .
- The position has to be right to fit the environment.
Quote: “I must be aware of the shapes of my arms and legs and make slight adjustments in every jump,” she said.
- She usually shoots her photos with a shutter speed of 1/500th .
- The position has to be right to fit the environment.
Quote: “I must be aware of the shapes of my arms and legs and make slight adjustments in every jump,” she said.
What Went Well And Even Better If
One thing that went well was that the lighting conditions were very good and the shutter speed was at the right speed to take the photos without making them look blurry. However, one thing that I would improve is to stop taking my pictures with negative space around the model and also keep the camera focus, as in some photos my camera was out of focus.
Tips
The tips I would give for someone who want to create this levitation illusion:
- Keep Your Feet Flat
- Tuck In Loose Clothing
- Tie Long Hair Up
- Keep Your Face Straight
- Put Your Camera On Continuous Shooting
- Increase Your Shutter Speed
- ISO - 400
- Dial - TV
- Keep Your Feet Flat
- Tuck In Loose Clothing
- Tie Long Hair Up
- Keep Your Face Straight
- Put Your Camera On Continuous Shooting
- Increase Your Shutter Speed
- ISO - 400
- Dial - TV
Benji Reid
Reid is known as a Choreo - Photolist. this a practice of where theatricality, choreography and photography meet in a single or series of images. He captures movement and motion to tell a story by a single photo.
- Quote = "There is movement in everything, but there is no drama without dramatic tension, and there is no image without soul".
- Quote = "There is movement in everything, but there is no drama without dramatic tension, and there is no image without soul".
Francesca Woodman 1958-1981
Woodman's Life
|
- Francesca Woodman was born on April 3rd, 1958, to artists George and Betty Woodman. Woodman is known for her blurry and ghostly looking photos. She first started taking pictures at the age of 13 and first had photography lessons at a boarding school in Andover, Massachusetts, which she then carried on studying photography at Rhode Island School of Design (1975 - 1977). While studying
Woodman took photographs in her studio, which was an unheated room (above a dry goods store called Pilgrim Mills), in Providence in 1976. Moreover, Woodman travelled to Rome in 1977 as an honour projects where she took her most poetic and provocative pictures. - After graduating, Francesca Woodman moved to New York in 1979 to pursue a fashion photography career. -The next two years of Francesca Woodman's life was troubling as she was suffering from depression from a lacklustre response to her work and a troubled relationship. In 1981, Francesca Woodman committed suicide at the age of 22. - Many remembered her as having a great sense of humour and was fun to be around. - Her work is now being recognised by many. .E.g. Self Deceit#1 - 1976 and Untitled - 1978. |

|
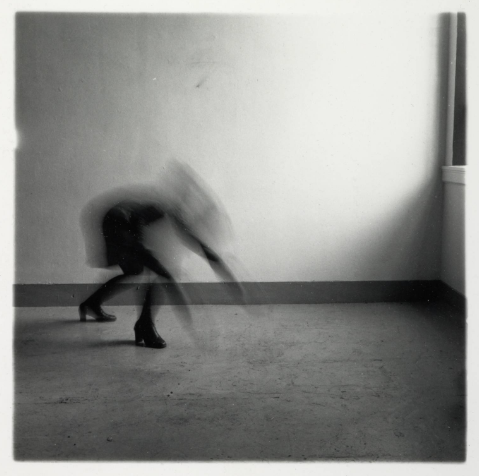
In the photo Providence, Rhodes Island, we can see that Francesca Woodman applied a slow exposure to her camera to create her moving figure into a ghostly presence. We can also see that Woodman used a long exposure to capture a vague image to create an ominous feeling towards the viewer.
In addition, the contrast of shadow and light used in the composition creates form, texture, and depth contrasting towards the figure which appeals to the audience. Furthermore, we can see that Francesca Woodman captured her illusory by applying a double exposure which creates a surreal effect on this photo. |
|
What Were Francesca Woodman's Intention's?
Francesca Woodman intended to create ghostly imagery and to reshape or flatten her flesh to appear grotesque and exaggerated. This is shown by the use of double exposure and a short speed to create this blurry effect which creates a sense of movement and urgency and to bend her body in a 'deformed' gesture to create this animalistic effect on the viewer. She wanted us to think about how we as the audience define her body in her pictures. The out-of-focus image illuminates how the viewer interprets the figure as it could be defined as something inhuman. In addition, She wanted us to think that she was something more than just a woman in the corner, she wanted us to think from this illusion that she was a ghost or something satanic in her photos. Francesca Woodman once quoted, “Am I in the picture? Am I getting in or out of it? I could be a ghost, an animal, or a dead body, not just this girl standing on the corner …?”
What Wider Context Was Woodman Addressing?
Woodman is considering the representations of the body. This is shown by the position her body is in and the effect of a blur, seeming as if she is headless. Francesca Woodman explores how the human body can be demonstrated in an abstract way in her photos. An example of this is in Providence, Rhodes Island (1975 - 1978) is that her arms look much longer than her body, and her hands deeming as if they are distorted.
How Does Woodman's Style Of Photography And Process Support Her Intentions?
Woodman used a long shutter speed and applied a slow exposure. This helped create her effect because both a longer shutter speed and a slow exposure produces a blur to her moving figure which creates a ghostly presence in her photos. This helps to support her intention of creating ghostly imagery because it illuminates as if the figure is not there, which shows Francesca's intention of something ominous or gloomy that is contrasting to death.
Furthermore, we can see that Woodman contrasted black and white to her picture. This helped her create this effect of fusing the figure and the background as it seems as if the figure is not there. This helps to support her intention to hide even in front of the camera because by contrasting the black and white it seems as if the figures blend in with the background.
Furthermore, we can see that Woodman contrasted black and white to her picture. This helped her create this effect of fusing the figure and the background as it seems as if the figure is not there. This helps to support her intention to hide even in front of the camera because by contrasting the black and white it seems as if the figures blend in with the background.
Francesca Woodman - Practical response
What Was I Trying To Achieve? & How Does It Link To Movement?
-While taking my photos, I was trying to achieve a blurry effect as we trying to recreate Francesca Woodman's photos. I did this by applying a long shutter speed (1/15s), then putting my ISO to 800 - 400. Then my model moved a part of the body as I take the photos. The movement of the body helps to create this effect as it seems as if you can't see that area or, it is as if it looks distorted.
- This links to the movement because to create this ghostly effect, the model has to do a type of action, as a long shutter speed captures this movement making the image look blurry. .E.g. moving their arms around, leg around.
- This links to the movement because to create this ghostly effect, the model has to do a type of action, as a long shutter speed captures this movement making the image look blurry. .E.g. moving their arms around, leg around.
Best Edits
What Went Well & Even Better If
WWW: One thing that went well was creating the ghostly effect by using a slow shutter speed, and taking the photo while the model moved around in a certain way producing this blurry effect.
EBI: One thing I would improve is by keeping my camera still as some of my photos were not straight and were quite slanted. Also, I would improve the number of my ISO as the lighting in my photos were quite dark.
EBI: One thing I would improve is by keeping my camera still as some of my photos were not straight and were quite slanted. Also, I would improve the number of my ISO as the lighting in my photos were quite dark.
Screen Grabs - How I Edited My Photos
Aperture
The Aperture is how much light passes through the lens. you can shrink or enlarge the size of the aperture to allow more or less light to reach the cameras centre.
The aperture can create dimension to your photos by controlling the depth of field on your camera. the aperture gives you blurred background so you can take the main subject of your image.
The aperture can create dimension to your photos by controlling the depth of field on your camera. the aperture gives you blurred background so you can take the main subject of your image.
Depth Of Field
Depth of field is the distance between the nearest and the farthest objects that are shown to be sharp in focus. The depth of field can be used by changing the focal length, distance of the subject and the aperture.
Examples Of (Shallow) Depth Of Field
Set 1

Aperture = f/8.3
Shutter Speed = 1/500 ISO = 400 |

Aperture = f/6.3
Shutter Speed = 1/500 ISO = 400 |

Aperture = f/6.3
Shutter Speed = 1/500 IS0 = 400 |
Set 2

Aperture = f/3.5
Shutter Speed = 1/200 ISO = 400 |

Aperture = f/8.0
Shutter Speed = 1/40 ISO = 400 |
Aperture = f/22
Shutter Speed = 1/5 ISO = 400 |
What Went Well & Even Better If
WWW: One thing that went well was the my composition. I think this because all of the models are 2m apart giving variation of the depth of field as the model in front is shown sharp in the view of image. In contrast, the tow other models are seen to be out of focus on the image implying variation of the aperture.
EBI: One thing that I would Improve was if my cameras aperture went much lower to show variation of the depth of field between the 3 images.
EBI: One thing that I would Improve was if my cameras aperture went much lower to show variation of the depth of field between the 3 images.
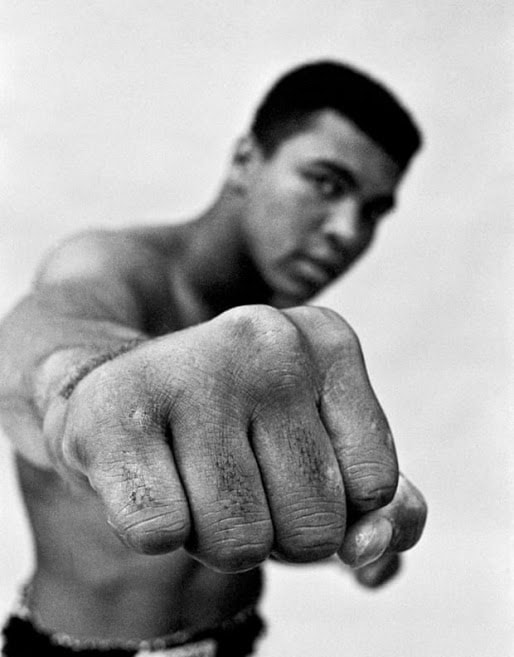
Muhammed Ali By Thomas Hoepker -1966
|
In this image of Muhammed Ali putting his fist up towards the camera, taken by Thomas Hoepsker (1966), we can see that the depth of field is shallow. I can interpret this because Muhammed Ali's fist is shown to be in focus (sharp) while the background is blurred out.
The effect of the depth of field gives the audience an impression of Muhammad Ali as strong and powerful. This is because his fist is zoomed in, in the composition, and the background being out of focus, giving depth and contrast towards his fist. Furthermore, I would describe Muhammed Ali in this picture as masculine and mighty in this photo. |
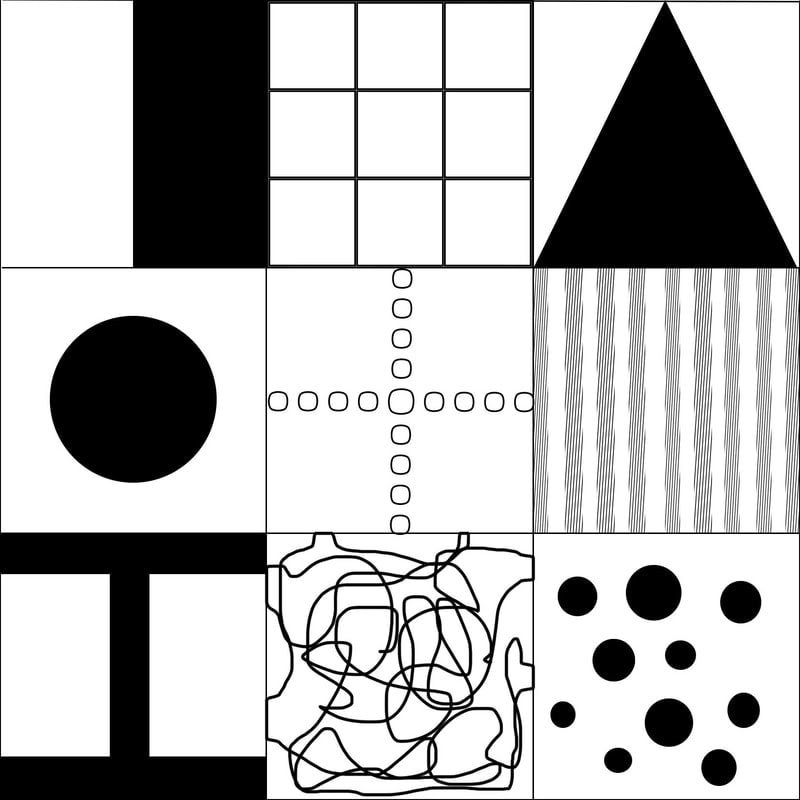
Composition
In todays task, I was required to take nine different composition in the handout I was given. The handout had different shapes which I had to apply to my photo.
Composition Exercise 1
Composition Exercise 2
How I Chose My Composition's
I chose my compositions by the sheet I was provided with. There were many different types of compositions with similar shapes on my sheet around my surroundings so I had many options to chose to take the best examples and to be creative. This was also an opportunity for me to apply the skills I learnt, for example, aperture and shutter speed.
Where Did I Find The Best Examples?
The best examples I found on the handout was mostly outside as it a variety of shapes like dents, circles and rectangles. Most of the shapes of the composition were gates as they had many different shapes.
Best Edits
|
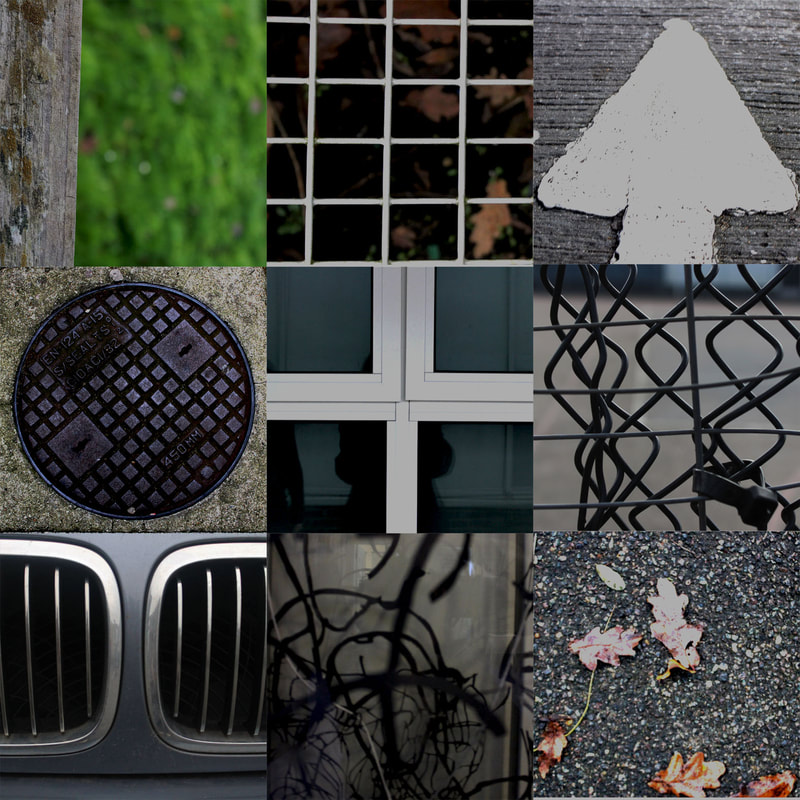
Examples
|
What Went Well And Even Better If
WWW = Was finding the different shapes around the school as there were many variations. For example, sides of buildings, cars, and around the floor. Also, the techniques we have learnt throughout the course helped us take these pictures. .E.g. aperture, shutter speed and ISO.
EBI = The editing was quite difficult as some of my pictures appeared bright and the pictures were quite small so I had to change the sizes of images without deforming them.
EBI = The editing was quite difficult as some of my pictures appeared bright and the pictures were quite small so I had to change the sizes of images without deforming them.
Rule Of Third
GIFS
Set 1